
Frequently Asked Questions
FAQ’s About Filling Gaps
Soudal products are available at most leading hardware merchants nationwide. Check out our Store locator here to find a store in your local area.
Please contact our team on info@soudal.com.au or alternatively get in touch with your local rep. For their details refer to the contact us page
All technical data is provided on the product page, if you have any further questions please contact us on 1300 50 70 11.
These are kept on the product page.
These may include:
- Fire test reports
- VOC Statements
- Watermark Certificates
FAQ’s About Filling Holes
A broad knife, sanding paper, sanding block, Filler/Flexible Filler/Expanding Foam (depending on the job)
Large or small, Indoor or Outdoor (every environment can be different)
This is all going to depend on how big the hole you are filling is and what you are using. You will also need to consider whether the filler you are using allows you to fill a deep/large hole in a single go, or if you will need to build it up in layers.
Almost any type of hole can be filled in any surface as long as the correct preparation, choice of product and filling is carried out.
A textured finish is possible however you will need to create the right surface appearance to match the surrounding surface, this may even require some specialist techniques to achieve this
Remove any flaky/dusty/rotten material, sand back the edges slightly to ensure there is no lifted surface at the edges.
Thoroughly blow out the hole, so it is free of dust and ensure it is dry.
Work the filler into the hole ensuring that you fill the back of the hole first, this ensures that you have no gaps sitting in behind the filler. You should always fill to just above the surrounding area so that you have a surface to sand back to. With some fillers you might need to build the depth of the filler up in layers, allowing it to cure between fills.
This all depends on what product you are using and the temperature of the area you are working in and the temperature of the surface you are filling.
For an epoxy filler (Soudal’s Universal Bog), the time may be as short 20 minutes until fully cured.
For a flexible filler (Pro Gaps range), these are not really designed to be sanded but rather just tooled off to a smooth finish, some of these you can paint after as little as 10 minutes.
As long as you haven’t tried to fill the hole with something like silicone, it is possible to paint over repairs.
Use a 80-120 grade sandpaper and a sanding block where possible as this will give an even pressure over the area you are trying to sand, especially if on a flat surface.
This is based on the environment, but if you have chosen the correct product for the environment, prepared the hole, filled it and coated it, then you could expect the repair to be permanent.
FAQ’s About Filling Gaps
If you are filling narrow gaps (between two surfaces) you are best to generally use a latex-based acrylic filler (Pro Gaps Fill & Paint) as this can be quickly smoothed off with a painter’s broad knife or silicone finishing tool (Soudal’s Soudaglatt or Silicone Spatula Kit).
If you are filling holes in plasterboard or timber you really require a ‘static filler’ (Pro Gaps Light Speed) that does not move, so that you get a good flat surface to paint over.
This is really up to you, if you think it is unsightly, and you are repainting a surface. Then doing the filling and finishing will give you a far better finish.
An expanding foam will fill larger gaps, but the you need to consider the following:
To use a foam, the gap really needs to be over 15mm in width, but you will need to think about how much you are putting in as there are often large open spaces behind the area and it is generally not advisable to just keep adding foam as the gap in behind was created for a reason by the original builder.
The expanding foam will need to be trimmed back below the top surface of the gap/crack (as the finish of the cut back expanding foam is not visually nice)
If outdoors, then the expanding foam is not UV stable so will deteriorate over time.
Cutting back the expanding foam means that the outer surface will no longer stop water coming through.
All expanding foams will, after being trimmed back, need a filler coating over it to make it look better but also to protect it.
Yes provided the filler allows you too, this is why the choice of using a silicone based product should be avoided unless you know that you will never be wanting to paint over that area.
Make sure any loose material is removed, and the gap/hole is clean, dry and dust free.
Work the filler into the hole ensuring that you fill the back of the hole first, this ensures that you have no gaps sitting in behind the filler. You should always fill to just above the surrounding area so that you have a surface to sand back to. With some fillers you might need to build the depth of the filler up in layers, allowing it to cure between fills.
This all depends on what product you are using and the temperature of the area you are working in and the temperature of the surface you are filling.
For an epoxy filler (Soudal’s Universal Bog), the time may be as short 20 minutes until fully cured.
For a non-flexible filler, the time will vary but may be as short, for some types, as 5-15 minutes before you can sand while for others it may be several hours.
For a flexible filler (Pro Gaps Range), these are not really designed to be sanded but rather just tooled off to a smooth finish, some of these you can paint after as little as 10 minutes.
Yes, but you need to understand the environment that you are working in and the conditions that the filler will have to endure over its life. It may be that you need to make a more careful selection of the type of filler when working outdoors than you may have to indoors.
Indoors generally only when you redecorate or make alterations.
Outdoors, will depend on the type/location of the gap that you are filling, but generally, expect a repair to last a number of years. Some of this will depend on your selection of a filler and how much movement it is subject to. Remember that if you are using an acrylic gap filler or an expanding foam to fill the gap, it will require protection from the elements through the application of two coats of paint.
Filling gaps has several advantages to help with energy efficiency:
- Prevents unwanted air flow or drafts outdoors.
- Can stop water or water vapour from coming inside.
- If you are filling narrow or small spaces in insulation, where conventional insulation cannot be placed, then you will improve the overall energy efficiency by filling the depth of the space with a product from the Soudal Expanding Foam range. Please refer to the technical data sheet on the product page.
FAQ’s About Sealing Gaps
Interior, either a latex based acrylic filler like Soudal’s Pro Gaps Fill & Paint or T-Rex Crystal.
Outdoors, Multibond SMX25 (if you want to possibly paint over the joint), or a quality silicone like Soudal Roof & Gutter or Soudal All Purpose if you never want to paint over the sealant.
This is really up to you, if you think it is unsightly, or the previously sealed joint is allowing a draft or water through the joint and you are repainting a surface.
Yes you can, but understand that you will never be able to paint over the sealant.
As long as you haven’t tried to fill the hole with something like silicone, it is possible to paint over most repairs.
The old sealant needs to be removed and the surface needs to be clean, dry and dust free.
Having the right product and tools is important, we suggest a neutral cure, mould resistant silicone, we suggest Soudal’s Bathroom & Kitchen Silicone. Unless you want to paint the surface, then go for an SMX based product like Multibond SMX or T-Rex Fast Grab.
This all depends on what product you are using and the temperature of in the area you are working along with the temperature of the surface you are sealing.
For a flexible filler (our Pro Gaps Range), these are not really designed to be sanded but rather just tooled off to a smooth finish, some of these you can paint after as little as 10 minutes.
Silicones will vary on the depth of the joint and the surrounding temperature, silicones will skin meaning it is waterproof immediately but will take 24 hours to full cure.
SMX based will vary on the depth of the joint and the surrounding temperature, you should be able to paint an hour after application
Yes, but you need to understand the environment that you are working in and the conditions that the sealant will have to endure over its life. It may be that you need to make a more careful selection of the type of sealant when working outdoors than you may have to indoors.
Indoors generally only when you redecorate or make alterations.
Outdoors, will depend on the type/location of the gap that you are sealing, but generally, expect a repair to last a number of years. Some of this will depend on your selection of a sealant and how much movement it is subject to.
Sealing gaps has several advantages to help with energy efficiency:
- Prevents unwanted air flow or drafts.
- If outdoors, it can stop water or water vapour from coming inside.
- If you are filling narrow or small spaces in insulation, where conventional insulation cannot be placed, then you will improve the overall energy efficiency by filling the depth of the space with a product from the Soudal Expanding Foam range. Please refer to the technical data sheet on the product page.
FAQs About Adhesives and Tapes
Tape is a backing film, most often made of either paper, cloth, or some type of plastic type material (Polyethylene, Vinyl, PVC, Polypropylene).
An adhesive is what causes the ‘backing film’ to stick to a surface.
Tape is a combination of a ‘backing film’ and an ‘adhesive’.
Pressure Sensitive Adhesive Tapes are a flexible and sticky adhesive tape that will adhere to a substrate by the amount of pressure used. This is different from just a normal adhesive tape where you put it in place and it holds, a pressure-sensitive tape requires physical pressure to the surface to ensure it bonds. If a tape requires heat or a special primer to make it stick, then this is not a pressure-sensitive tape.
There are many different types of adhesives, some are more common than others:
- Common – Water-based (acrylic), polyurethanes, super glues, solvent based
- Specialist – Hybrid Polymers (SMX), Butyl, Bituminous, Silicone
Adhesives are designed for particular surfaces, while some are designed to work on a wide range of surfaces, others may only be good for very few surfaces. This is why it is important to understand the surface you are sticking to, the job you are asking the tape to do, and the environment that the adhesive will be working in.
As there are many different types of adhesive the drying times for adhesives also vary a lot. Depending on the adhesive the time range to cure could be from a few seconds to many hours. This is also why it is important to understand the surface you are putting it on to, and what you are wanting trying to achieve and what the environment is.
It is best to refer to the specific technical data sheet for the product you chose to get this answer.
It is often very difficult to remove all traces of an adhesive from a porous surface such as wood concrete/stone due to the adhesive getting into the pores of the material.
In most situations uncured adhesives can be removed with Swipex Wipes, ensure you act fast before the product cures
Many adhesives can be removed from a surface however this is dependent on
- The type of surface
- The surface finish
You may require a particular ‘remover’ for that adhesive type to do the job. It is best to discuss this with the adhesive supplier. It is never a good idea to just try different products to remove an adhesive because you may use something that will cause the adhesive to set even harder to the surface. It is always recommended that you try any product used as a ‘remover’ on a small unobtrusive area first to ensure that you do not damage delicate surfaces.
If this is the adhesive from a tape then Yes, however, you will very likely require an ‘adhesive label remover to do this successfully. Even more so if the tape has been in place for a period of time.
Paper-backed, Cloth, Vinyl (PVC), Acrylic, Polypropylene (PP), Polyethylene (PE), Teflon (PTFE), Aluminum Foil, Bituminous, Butyl, Amalgamated Rubbers
Yes, although you need to choose the correct tape for the surface you are putting it on to and the environment.
Start by understanding the surface you are putting it on to, and what you are wanting to achieve, and what the environment is. Some tapes work better on some surfaces than others, while others, if the surface is too cold/hot require some preparation to help them stick as they are designed to.
Yes, many can as both the backing surface and the adhesive are both waterproof and UV resistant, but again it comes down to understanding the surface you are putting it on to, and what you are wanting to achieve, and what the environment is.
This largely depends on what you are trying to achieve. Often while the ‘backing’ tape will last for a long period of time the adhesive itself may change over time. Exposure to the elements does affect how long the backing tape will last.
As a rule of thumb:
- Most decorator’s tapes that you buy will state on the packaging the length of time that you can apply them to a surface, and they can be removed without leaving any adhesive residue. Commonly, these are a form of paper-backed tape. There are also Vinyl-backed decorator’s tapes that may be more suitable for outdoor use but again check how long you want the tape to last before removing it, without leaving any adhesive residue.
- Some Vinyl/Polyethylene backed tapes can last for up to 6 months but you need to choose these carefully and check with your retailer for specifics.
- Aluminum/Bituminous/Butyl backed tapes, if used in the correct environment can be used for many years.
FAQ’s About Anchoring Adhesives
A pressure-free securing of threaded rods, studs, reinforcement bars, threaded collars, profiles etc into concrete, concrete blockwork, stone and masonry substrates.
Chemical cure, the product has a special nozzle that mixes the product when it is gunned out. The chemicals then react with one another to cure to create a strong lasting bond when mixed correctly.
SoudaFix VE-400 is for heavy to medium applications. It has a C1 Seismic Rating, works on cracked and uncracked concrete and compiles to requirements in the Australian Building Code.
Soudafix CA1400 is for medium to lightweight applications and only in uncracked concrete into concrete, concrete blockwork, stone and masonry substrates. It can be used on solid & hollow materials and is suitable for exterior applications.
If you are meaning, “can I use it to repair cracked concrete back to its uncracked/original strength”, then unfortunately No.
The anchor adhesive can be used to repair and fill cracked concrete, however while it will provide a strong hardwearing repair, this will not result in the cracked concrete having the same strength as it had before it was cracked.
The requirement is set out by the NCC, Engineers and Building Authorities when they consider the anchor to be critical to function and if there is a possibility of endangerment to human life.
AS5216:2021 Concrete Standard (amendment 3) included requirements for all post-installed concrete anchors to be designed to European Design Standards (EOTA TR045) and European Test Standards (ETAG 001). The standards written in ETAG 001 set out the basis for using anchors in cracked and uncracked concrete. The scope of ETAG 001 states that C1 and C2 anchors should be specified “when failure of anchorages made with these products would compromise the stability of the works, cause risk to human life and/or lead to considerable economic consequences.”
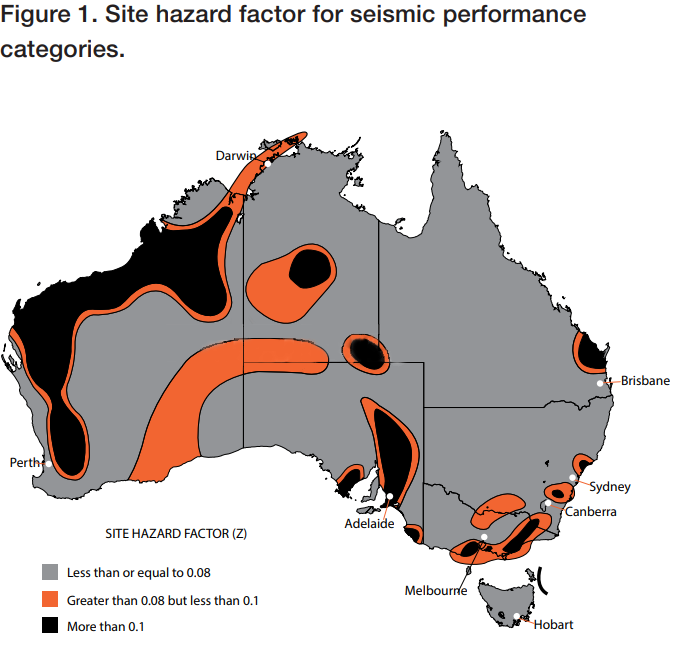
Fasteners are tested while being subjected to simulated seismic tension and shear loading, crack effects, and simulated seismic crack cycling. Only fasteners that have undergone evaluation in both cracked and uncracked concrete and have a valid ETA are pre-qualified for seismic testing. Pre-qualification of fasteners for seismic actions is evaluated under seismic performance categories C1 and C2. These categories are explained below:
- Performance category C1. This category tests fasteners under pulsating tension load and alternating shear load while accounting for the effect of concrete cracking. For C1, a maximum crack width of 0.5mm is considered in the test program.
- Performance category C2. This category considers fastener reference tests to failure in addition to tests under pulsating tension load and alternating shear load while accounting for the effect of concrete cracking. For C2, a maximum crack width of 0.8mm is considered and cycled from 0.1 to 0.8mm. C2 is a more stringent seismic test program when compared to C1 and is difficult for many post-installed fasteners to qualify against.